Showing posts with label recipe. Show all posts

Jun 6, 2018

Twice Baked Spaghetti Squash


I seriously love spaghetti squash! Though, the first time I made it, I wasn't a real big fan. Spaghetti squash has to be cooked just right or else the "noodles" will be too crunchy (unless you like it that way). This is also why I like twice baked because it ensures that everything is cooked just right!


Ingredients
1 or 2 Spaghetti Squash (I typically just do one at a time)
1 lb turkey sausage (this typically has a higher protein content and less fat than pork sausage)
1 medium yellow onion - cut in to small pieces. (I like to cut them in small squares)
1 Tbsp minced garlic
1/2 jar of Prego Spaghetti Sauce - Garlic & Herbs
1/2 cup mozorella cheese (possibly more or less, I don't measure this one)
1 zucchini or other veggies of your choosing (optional)
Approx. 1 Tbsp of olive oil
Salt & pepper to taste

Directions!


  • Preheat oven to 400 degrees. 
  • Cut off the end/tip of the squash and cut the squash in half length wise (using a super sharp knife helps) and scoop out all the seeds
  • Rub about 1/2 Tbsp of olive oil on the inside of the squash, season with salt and pepper to taste
  • Place prepared squash on a baking sheet, cut side down (I like to line my baking sheet with aluminum foil- easier clean up later)
  • Bake squash on the center rack for about 40-50 min, depending on the size of your squash. (The outside should be slightly golden and the inside easy to puncture with a fork)


I typically like to wait about 15-20 min after the squash finishes baking before I do the rest, that way the squash cools down a little bit before I attempt to scoop out all the insides! Once the squash is done, I use a mitt to turn it skin side down on the baking sheet while it cools

  • In a large skillet, brown the turkey sausage. 
  • Add onion and garlic until the onion begins to turn transparent (if adding zucchini, I add it here also, so it cooks long enough to get soft). 
  • Use a fork to scoop out the spaghetti squash and add to sausage mix. (Don't worry if you can't get it all out to the skin, it helps keep the shell nice!)
  • Add mozzarella cheese to the mix - I typically do a few handfuls until it looks cheesy enough
  • Add about 1/2 a jar of spaghetti sauce
  • Once all combined, place back inside the spaghetti squash shells. 
  • Top with more mozzarella cheese and bake for an additional 15 minutes. 

And that's it! I loooovvveeeee eating this with Ritz crackers right out of the shell. Seriously the best


Enjoy!!

Cheers!

 photo signaturetb2.png

Feb 3, 2015

Easy Garlic Chicken

Hello! It's time to share one of my favorite chicken recipes! Garlic Chicken! I found it awhile ago over on food.com(We also had it for dinner over the weekend.) It's really easy (I promise) and there are only four ingredients! Prep time is about 10 minutes and cook time is about 20-30 minutes, depending on how thick the chicken is. I would suggest pairing it with some butter noodles or something similar. Yum!

Ingredients:

  • 4 boneless skinless chicken breasts
  • 4 garlic cloves, minced (I have a jar of pre minced garlic. It's super convenient)
  • 4 tablespoons brown sugar
  • 1 tablespoon olive oil
  • additional herbs and spices, as desired. 


Directions!

  1. Preheat oven to 450°F, line a baking dish or cookie sheet with aluminum foil and lightly coat with cooking spray or lightly brush with oil. (I wouldn't suggest a cookie sheet. Mine always comes out fairly juicy!)
  2. In a small sauté pan, sauté garlic with the oil until tender. 
  3. Remove from heat and stir in brown sugar. Add additional herbs and spices as desired. 
  4. Season chicken with salt and pepper. Place breasts in prepared baking dish and cover with the garlic and brown sugar mixture. (It may be helpful to prepare the chicken in the dish first, and then sauté the garlic)
  5. Bake uncovered for 15-30 minutes, or until juices run clear. (I honestly don't know what this means... But I normally take it out at the earliest end time, cut the thickest part of chicken to see if it's done or not and either take it out, or put it back in the oven for a little longer.) Of course, cooking times depend on the thickness of your chicken. I personally don't like my chicken super thick, so I always cut it in half.
Voila! That's it. Fairly simple and painless. This time when I made it, I cut up some onion that I was going to place on the bottom of the chicken (so it could absorb the juices) but I forgot. So I placed them onto instead. Also, the next time I do this recipe, I'm going to see how it goes in a crockpot! 


This was just before I put it in the oven

That's actually 4 chicken breasts that I cut in half :)

If you can't tell.. I used a LOT of garlic. Yum!


 photo signaturetb2.png

Jan 10, 2015

Raspberry Oatmeal Bars

I must say, Raspberry Oatmeal Bars are some of the most delicious dessert bar things ever!! And it always saddens me because when I make them and take them to an activity or something, they get eaten quickly...and I hardly ever get to save any for later...

I also have this recipe completely memorized since I made them almost 4 different times within a two week span. (They are seriously that good...and addicting!) And they are just way too easy to make! 


I seriously want to make more and eat them all just by looking at this picture... But that there is the finished product

Prep time : approx 15 min.
Cook time : 35 min
Yield: 9-12 bars (depending on how you cut them)

BTW, I tend to make a double batch of this stuff because really, one is just not enough. But here is the recipe for a normal batch.

Ingredients: 

1 cup all- purpose flour
1/4 tsp baking soda,
1/4 tsp salt
1 cup rolled oats: old fashioned (I honestly don't know if it matters what kind of oats you use. I always use quick oats because it's what I already have on hand almost all the time...)
1/2 packed light-brown sugar (I usually just use golden brown sugar. Not sure what the difference is)
1/2 cup unsalted butter, softened (Room temp works a little nicer!)
3/4 cup raspberry jam, seedless if preferred (You really can use any flavored jam that you'd like. I don't really measure this out either. I just put in what looks like enough. And I use homemade raspberry jam. So good!)

Directions:

Preheat oven to 350 degrees. Line an 8x8in baking dish (I only use glass baking dishes for this) with aluminum foil, leaving a 2-inch overhang of foil on two sides. Grease foil.

In a large mixing bowl, whisk together flour, baking soda and salt. Stir in oats and brown sugar, and use clean fingertips (as needed) to break up brown sugar clumps. Add butter, and using fingertips, work butter into mixture until evenly moistened.

Add 2 cups of the oat mixture to the prepared baking dish and press into an even layer. Spread raspberry jam (or any other flavored jam) into an even layer over oat later, coming within 1/4-inch of all edges. Sprinkle top evenly with remaining oat mixture, then slightly press into jam layer.

Bake in preheated oven until golden brown, about 34-38 minutes. Remove from oven and allow to cool completely before cutting into squares. Store in an airtight container. (Though you may not need a container if you eat them all!)


My crumble mixture! 

And after I pressed it into the pan..

And the jam! Don't forget to leave a 1/4 in gap from the foil.

Sprinkle the remaining over the top and slightly press. Ready to bake! 

All done! Let it cool for at least 30-45 min before cutting so it won't collapse in.

Enjoy! :)

And there you have it! The best raspberry oatmeal bars ever! <3 I hope you make them, love them, and share with your friends!


 photo signaturetb2.png

Nov 20, 2014

Moist Banana Bread

Okay so funny story... There are two ladies at my work that refuse to eat bananas once they have any speckle of brown on it. Brown speckles are the optimal time for eating the bananas! And more nutritional value than when they are green!!

So because of this, one of the ladies gave me an entire hand of bananas... approximately 7 bananas? (Fun fact: a hand of bananas = a bunch like you would get from the store and a finger is just one banana, silly huh?) And then the other lady gave me one that she just couldn't handle trying to eat because it as too mushy. Silly silly ladies! I also had a few ready to use bananas at home that I just hadn't gotten around to making banana bread yet. So now I had ten bananas to make bread with! (the recipe only calls for 2-3 per recipe!) Then my husband decided to eat one of the gross mushy brown bananas instead of the hand that was nice and yellow. (He comes from a family where you eat the stuff going bad first before you eat the nice fresh stuff) Anyway, I wish I would have taken a picture of all the gross brown bananas. And we were getting fruit flies so that is a prime indicator that it is time to make banana bread. (These bananas are about a week fresher than when I made the banana bread. They were pretty brown and gross by the time I got around to it...and this is only half of them...)


The banana bread recipe I use is found here. (It's towards bottom of the page)

I use the full amount of brown sugar and of course, you can't forget the walnuts! I also probably use a little more cinnamon than what is calls for (I love cinnamon btw). Also, please be wary of the cooking times for the bread because I'm pretty sure it lies! I think 1 hr 10 min is way too long. So depending on the size of the loaf, I'll stick to a start time of 30 -45 min and then check it. (overcooked banana bread just isn't as moist and delicious..) I guess if you are making a bunch of loaves you could do a test one, and then once you figure out the optimal cook time, you can implement that on the rest of the loaves. However, most people aren't going to triple the recipe like I had to do. So many bananas!! But I've made this stuff enough where I can almost tell it's done just by looking at it. (Side note: If the middle collapses quite a bit when it's cooling off, it probably should have cooked a little longer.)

As you can see down below, I almost didn't have a bowl large enough to mix the wet and dry mixture. I as actually afraid it was going to overflow...but it was a success and it all fit in one bowl! (Next time, however, I plan on doing a double batch at most. It's a lot easier for mixing purposes.)


And then all my loaves. I did a bunch of minis so I could give them to everyone at work so we wouldn't be stuck eating them. There is also a large loaf in the oven, so there was quite a bit of banana bread.


I am also sad to say that I forgot to take pictures of the finished product. I really just wanted to go to bed at this point!! But everyone at work LOVED loved loved the bread! 

And they all know to bring me old bananas so I can make more. :) #nomnomnom


 photo signaturetb2.png

Oct 22, 2014

Perfect Pot Roast Every Time!

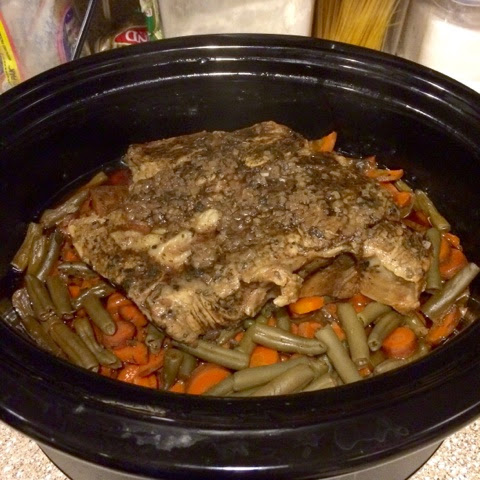
Hello! Since I am made a Pot Roast today, I thought I would share with you this SUPER easy recipe. And honestly, I think it comes out perfect every time! And it's delicious! Just as good left over as well!

First and foremost, you are going to need a crockpot. Scott and I got this super sweet one for our wedding that turns automatically to warm after the allotted time. Cool right?! No more constant cooking food! Hooray! It's way convenient since from the time I plug it in, to the time we eat, WAY longer than 8 hours. (I also don't recommend cooking on high heat for shorter the time. It tastes way better and the meat is more tender when cooked longer on warm)

Let's get to it!

So really you can customize this the way you choose. I like to use....

- Potatoes
- Carrots
- Onions
- Green Beans (save the juice if you are using from a can!)
- And of course, some type of beef roast. (I think chuck roasts are the best. They have more fat in them but they are juicier and literally fall apart when done cooking)
- And we can't forget McCormick Slow Cooker: Savory Pot Roast flavor packet! 

You can also add:

- Corn
- Celery
- Fresh Garlic
- Bell Pepper
- etc. (almost any veggie really)

I like to wash and peel my potatoes. You don't have to peal them though if you don't want to. I like to cut mine into approximately 1 in cubes. (though they really are more triangular like) I usually cut up enough so they cover the entire bottom of the crockpot and then a little more.

I also have a big beef on baby carrots so I refuse to use them. (I'm pretty sure they are left over big carrots that they shave down and soak in bleach and then re dye them. You can go ahead and look it up if you'd like) I don't like to peel the carrots because they are just fine the way they are! However, I do cut off the ends. For the bigger end of the carrot, I sometimes cut it in half. Really they can be as big or small as you prefer. I sprinkle the carrots on top of the potatoes. Not enough to completely coat the top but just enough.

Next comes the onion! I sometimes cut the onion up in squares, sometimes in strips. It just depends on my mood really. I tend to eat the onions more when they are squares though. I usually like to do half of a yellow onion, but it really depends how big your crockpot is.

For the green beans, I sometimes use a can (usually just one) and sometimes the fresh ones. This time around, I did a can. (the nice thing about using can GB is that you can use the juice for the flavor packet!) My mama likes to add the green beans at the end so they don't turn into mush, but I like to put them in in the beginning. If you are using fresh GB, I like to cut off the ends. You may also want to cut them in half or even in thirds. (sometimes those things are way long!) So you can either put them in now and sprinkle it over the top, or wait towards the end.

The roast! Like I mentioned earlier, I really think its better to get a chuck roast. Usually they are more flat and have more fat on them.

Next, either use a cup of water, or the juice from the green beans. Poor it into a bowl and then mix in the savory roast flavor packet. (it tends to get little bubbles where little pieces don't mix all the way, but that's okay really. Pour slowly so if you see a bubble, you can mix it) I like to pour it all over the roast. The juice will run off but I like to try to get most of the spices on the roast. Try and get out as much of the spices that are stuck on the bowl as you can.

You are all set! If you are preparing the night before, just put on the lid and stick it in the fridge. If you are ready now, put a lid on it, set it on low and set your timer for 8 hours!

I always love coming home when a roast is cooking. It smells so good! 

When 8 hours rolls around, it should look pretty scrumptious! Get a big fork or spoon and mix it all together! The meat should just fall apart. Mmmm! (that's how you know it should be done. if it doesn't fall apart, it should probably cook a while longer.)

Season with salt and pepper and you are all good to go! My hubby and I like this with crescent rolls. Yum!


Enjoy!! 


 photo signaturetb2.png

Feb 4, 2014

Pineapple Salsa

First of all, who doesn't like salsa, am I right? I mean like come on. There are a bazillion different kinds of combinations you could throw together to make a scrumptious salsa exactly to your liking! Sounds great, right?

Me, being from Tucson and all, I should love Mexican food, right? Wrong. I know, I know, it is pretty hard to believe. And all the places which I have lived have been full of Mexican food whether it's authentic, americanized or tex-mex. Don't get me wrong, I am trying to expand my food liking horizon! I also am a wee bit of a heath nut and a bit particular about...mmm… everything. (bless my husband's heart) But anyway...I don't like beans (at least the mushy ones), or too much cheese, or greasy grossness, or tomatoes. Those are the worst. I wont even touch them let alone cut them up and put it in a salsa.

Which brings me to pineapple salsa! A bazillion times better than tomato salsa! And the best thing about this is that it is both sweet AND spicy! So delicious. And colorful!


Here is what you will need:
  • 2 Tablespoons (30 ml) olive oil
  • 1/2 small onion, peeled
  • 1/2 small red bell pepper, chopped
  • 2 Tablespoons (5 g) fresh chopped cilantro leaves
  • 1/2 lime, peeled
  • 1/2 teaspoon salt
  • 1/4 jalapeño pepper
  • 1/2 pineapple, peeled, cut into large pieces
I don't like cilantro, so I am not going to include that. It has such an odd
flavor that I'm not too keen of. I also added a red pepper along with the red bell pepper to give it some more flavor.

Directions:
  1. Place all ingredients into the Vitamix container (or ninja or whatever you have) in the order listed and secure lid.
  2. I have a vitamix, so I start off at the lowest variable.
  3. Turn machine on and slowly increase speed to Variable 4.
  4. Blend for 15-20 seconds, using the tamper to press the ingredients into the blades.
(Remove seeds and membrane of the jalapeño for a milder salsa. You may also substitute fresh mint for fresh cilantro.)

BTW. So I got a little excited and added the pineapple first when I should have did it last. Don't make this mistake! Really, all I think it does, is make it a little more juice since the pineapple gets blended a lot more, being on the bottom and all… Still tastes really good! Also, if you like it more spicy, find a bigger jalapeño pepper! :) 

Obviously, if you have a different machine, you may need to make adjustments to the Variable Speed, processing time, and/or ingredient quantities. My parent's really old blender thing they had when I was younger had a million buttons and I would always just press all of them, one at a time, until whatever I was making became the consistency I wanted.

Anyway... voilà! Get some chips, eat and enjoy!

 photo signaturetb2.png